We’ll make a simple shortlist of three London museums. You can follow the same steps with your own places. The example notes are reminders to check visit details before you go.
Create and name your map
Open Google My Maps in a computer browser and sign in with the account you intend to keep using. If a school or work account cannot open the service, ask its administrator about access rather than moving the work to a personal account.
- Click Create a new map.
- At the top left, click Untitled map.
- Name it London museums.
- Add a description such as: “Three museums to consider for a London visit. Check visitor information before travelling.”
- Click the first layer’s title and name it Museums.
My Maps is separate from the ordinary Google Maps search and directions screen. If you only need a saved list, navigation or a globe presentation, the Maps, My Maps and Earth comparison can help you choose before you build.
Add your first place and give it a useful note
Start with one museum so you can see how a place behaves before importing a table.
- Select the Museums layer.
- Search for British Museum, London, United Kingdom.
- Open the result and check that its name and location match the place you intend.
- Click Add to map.
- Open the added place and use the Edit pencil in its information box to change its text.
Keep the museum name as the title. Add a note such as: “Check opening times before choosing a day, and confirm the visitor entrance before travelling.”
A useful note tells someone why the place is on the map, what they need to decide and where to check further. When you add researched information, add the relevant official visitor-page link. Include a date beside details that may change, such as opening arrangements. Leave out private booking references and personal contact information.
You can also place a marker yourself: choose Add marker, select a layer, click the intended position, give it a name and click Save. For a named public place, search first. A marker on a building is not necessarily an entrance.
Repeat the search-and-add steps for Science Museum and Natural History Museum, checking that each result is in London. You now have the three places for the shortlist. If your places are already in a spreadsheet, you can use the import method below instead.
To move an existing marker, drag it on the map after confirming the intended location. Do not shift it simply to separate overlapping symbols; that changes what the map says about the place.
Use layers for groups you want to show or hide
A layer holds a group of places, lines or shapes. Check or uncheck its box to show or hide that group. My Maps starts with one layer and allows up to ten. Keep the three museums together in the Museums layer so someone can see or hide the whole group at once.
If the map later grows, separate groups when it helps someone read it, such as museums and other public stops. Review hidden layers before sharing: turning a layer off is not a privacy setting.
Add places from a spreadsheet
You can import a list instead of adding each place by hand. Put field names in the first row and one place on each following row. Our example uses Place, Location and Notes. If you already added the three museums above, try this sample in a separate new map to avoid duplicate pins.
Include the city and country in Location to help My Maps find the right place. These sample notes are reminders you can replace with your own.
| Place | Location | Notes |
|---|---|---|
| British Museum | British Museum, London, United Kingdom | Check opening times before choosing a day. |
| Science Museum | Science Museum, London, United Kingdom | Add an official visitor-information link. |
| Natural History Museum | Natural History Museum, London, United Kingdom | Check the visitor entrance before travelling. |
You can download this three-place example as a CSV, enter the rows in a Google Sheet, or save them from a spreadsheet application as CSV or XLSX. Then return to the map:
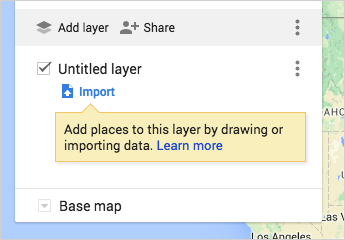
- Use an empty layer named Museums. Click Add layer if your map does not have an empty layer.
- Under that layer, click Import.
- Upload your file or choose the Google Sheet, then click Select.
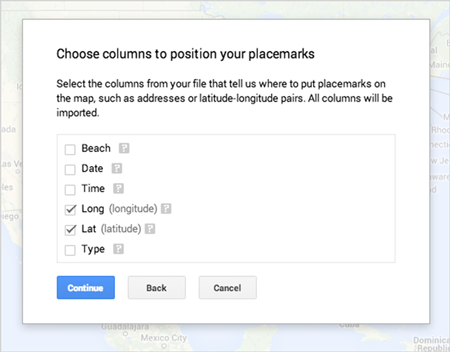
- Choose Location as the column that positions the places, then Continue.
- Choose Place as the marker-title column, then Finish.
Location tells My Maps where to put each row; Place tells it what to call the marker. Notes should not be selected as location information.
Open the Museums layer’s More menu and choose Open data table. Look for all three museum rows. Then open each place on the map and inspect its position at a useful zoom level. A matching row count is not enough if a museum has landed in another city. Compare ambiguous results with a separate place search and the institution’s own location information.
For larger spreadsheets, Google’s import guidance sets a maximum of 2,000 rows. Check its file-size limits before uploading a larger dataset.
Keep the source spreadsheet. Editing a Google Sheet does not automatically update its imported map layer. Some reimport choices delete existing features, so save a copy before replacing or matching data. The CSV, Excel and Google Sheets import guide covers location fields, larger tables and later updates.
Make the map easy to read
For three museums, a consistent symbol and readable names are usually enough. Open the layer’s Style control and choose Uniform style to give the places the same color and icon.
The layer styling controls also offer Individual styles, Sequence of numbers and Style by data column. Numbers can express an order you have chosen; they do not calculate the best visiting route. Styling by a column becomes useful when your table has meaningful categories.
In the layer’s Style panel, use Set labels to select the column containing the museum names. Choose Place for the imported sample; for manually added markers, select their name or title column. At the bottom of the left panel, open Base map and choose a background that keeps those names legible.
Keep the spreadsheet or a plain-text list alongside the map. Repeat important distinctions in words rather than relying on color alone.
Optional: add a route you already have
If you already have a GPX route or track, you can import it into a separate named layer using Import. My Maps accepts GPX directly; this step does not require a converter.
Keep the original file and compare the imported path, stops and any gaps with it. Review the file for personal locations before sharing. The guide to importing GPX into My Maps covers these checks and phone viewing.
A displayed track is not turn-by-turn navigation along that exact line. Choose and inspect a navigation route separately in Google Maps if you need directions.
Choose who can view or edit
For the museum shortlist, give companions view access unless they need to change the places or notes.
In My Maps, click Share in the left panel. Allow link sharing lets you distribute a map URL; Make your map public lets anyone find the map. A link can be forwarded, so use named-account access when the audience needs to stay limited to invited people.
To invite named people, you can select the map in Google Drive, click Share, enter their email addresses and choose Can view or Can edit. Drive’s map permissions stay in sync with My Maps. Can comment behaves like Can view for maps; it does not add a separate commenting role.
Before sending the link:
- Check every layer and note for material you do not want to share.
- Give edit access only to people who need to change the map.
- Save the sharing changes and ask a recipient to open the link using the invited account.
- Use Preview to inspect the viewer layout, but test recipient access separately.
View-only prevents editing, not copying: viewers can still share, export and print. The documented website-embedding option requires a public map, so do not make a private map public merely to get an embed or solve an access error.
For a class, sharing a My Map with students explains named editors, separately owned student maps and Classroom links. Keep student homes, identifying private notes and personal photographs out of a map that may leave the class.
View it on your phone
Open the Google Drive app on your phone, find London museums and tap it. Drive opens the map for viewing in your phone browser. Use the account that owns the map or has access to it. Custom maps can also be viewed in Google Maps; keep creation and editing on a computer rather than depending on mobile editing controls.
My Maps files do not use your Google Drive storage quota, but they are not available through Drive offline. Before travelling without a dependable connection, keep a separate list of the places or use the map menu’s Print map option for a paper reference.
For offline navigation, prepare Google Maps separately using the offline maps guide. A My Maps sharing link is not an offline download.
Save a copy of the map or one layer
Choose the output according to what you want to keep.
For the whole map, open its menu in the left panel and choose Export to KML/KMZ. Follow the download choices, selecting the whole map if a scope choice is offered. KML holds geographic features; KMZ packages KML and may include supporting resources.
For a spreadsheet, open the Museums layer’s menu and choose Export data → CSV. That downloads one layer’s table. There is no single whole-map CSV export; repeat the layer export only for other tables you need.
These are Google’s documented map and layer download routes. Open the result before relying on it: compare the museum names, positions and notes, plus any other layers you added. Check the CSV in a spreadsheet and the KML/KMZ in the mapping application where you intend to use it.
Keep the original map and source table. An export may not preserve every icon, image or product-specific behavior, and it does not transfer the map’s sharing permissions. Save copies somewhere you control before a school or work account closes.
For opening the result in Earth, making an editable Earth copy or investigating missing content, use the My Maps export and Earth guide.
When something does not work
If Import is missing, first check that you are in My Maps on a computer and have edit access—not just the map viewer.
If an upload is rejected, check the actual file format, header row and location values. Try a small copy in a fresh layer while keeping the original unchanged. If the browser reports blocked Drive access, check the permission allowing My Maps to open Drive; do not clear unrelated account data.
If places are missing or misplaced, compare their rows with a row that worked. Add enough city or country context to distinguish names, then inspect the new positions. For “Anonymous uploads are not allowed,” check account and edit access. The troubleshooting guide also covers file rejection, locations and reimport damage.
If someone cannot open the finished map, check the invited account and sharing settings before changing visibility. A school restriction needs an administrator’s help, not a public map.
Sources
Create or open a map, add and edit places, and the custom-map tutorial provide the creation, editing, import-field and label instructions.
The Maps Guide: spreadsheet imports, classroom sharing, and map exports.