
Choose the tool for the work students will do
Google Maps suits looking up places, discussing Street View and preparing directions. Preview street-level scenes before projecting them, and check Street View coverage if a scene will not open.
Google My Maps suits a collection of student-written captions, thematic layers or a spreadsheet of locations. A saved list in ordinary Maps is a different object; use My Maps when students need to organize and explain mapped features.
Google Earth suits relief, 3D views, historical imagery and a presentation that moves between places. The Maps, My Maps and Earth comparison helps with that initial choice. If Earth fits, choose its web, desktop or mobile environment using the Earth version comparison.
Check school access before preparing student instructions
Ask the administrator whether the intended student accounts can use My Maps or Earth. Google Maps is an Additional Service in Workspace for Education, rather than a core classroom service.
Schools must arrange the required parent or guardian consent for under-18 use of Additional Services. Administrators must also review and reconfirm access annually. A service can appear switched on while an overdue consent confirmation blocks younger users.
Have a student open the intended link with their school account, or ask the administrator to arrange an equivalent permissions check. Test viewing and editing separately. If access is blocked, use a school-approved alternative or paper; do not send minors to personal Gmail accounts as a workaround.
Under-18 school accounts also have Maps and Earth restrictions, including no Timeline, live location sharing or public posts such as reviews. Keep the activity about researched places, not students’ movements.
An example lesson: three places in an early research story
For an introductory 50-minute lesson, use Bournemouth, Nairobi National Museum and Gombe National Park from Google Earth Outreach’s Jane Goodall teaching example. Adapt the timings to your class.
Objective: students will connect a place to a passage in a source, write a sourced caption, and distinguish a town or region from an exact event location.
The question is: What does each place contribute to the story, and how precisely can we locate it?
Use the tutorial’s biographical passages as the reading material. Its account is a teaching source, not Goodall’s own travel record. The lesson does not require students to reconstruct her journeys or locate private homes.
Prepare a computer and projector, the three-place map, the reading, and a matching site table. Students can complete the task without editing the live map.
Prepare the map
Google’s map creation instructions cover the starting controls. On a computer:
- Sign in to My Maps with the approved account and choose Create a new map.
- Select Untitled map. Name it “Three places in Jane Goodall’s early story” and put the lesson question in its description.
- Rename the first layer “Places in the account”. One layer is enough for this lesson.
- Search for Bournemouth, Nairobi National Museum and Gombe National Park. Check the country and surrounding labels before using Add to map for each result.
- Open the Bournemouth marker’s information box and use its edit control. Keep a short place title, put the sample caption below in the description, and save the change. Leave the other two captions for class discussion.
- Prepare a document or printed table with columns for place, source passage, explanation, location precision and unanswered question. The same information should be available without opening a marker.
You can download a blank source table and adapt its columns to the lesson.
The mapping research resources can help organize that companion document when the assignment grows.
A sample marker caption
Bournemouth, England — childhood setting. Google Earth Outreach’s teaching account places Goodall’s childhood here and describes how reading helped develop her interest in animals. This marker represents the town, not a particular home. It introduces the interests described before the later Kenya and Gombe stops. Source: Google Earth Outreach, Create a map or story in Google Earth Web. Location precision: approximate, town level.
The caption names the place, explains its relevance, credits the account and limits what the point means. Students should use that structure without copying its wording for every stop.
Run the lesson
- Minutes 0–5: show the three places. Ask students what they can learn from their positions before reading the captions. Separate observations about location from guesses about events.
- Minutes 5–12: read the relevant passages. Students underline the place names and note what happened, when a date is given, and what the account leaves unspecified.
- Minutes 12–20: open Bournemouth and discuss the sample caption. Ask why a town-level marker should not be described as an exact childhood address.
- Minutes 20–35: pairs draft a caption for the museum or Gombe in the companion table. Require a source credit and a statement about location precision. Collect the drafts rather than giving everyone edit access to one map.
- Minutes 35–45: add selected captions to the projected map. The tutorial uses the museum as its Nairobi stop, but its account of the meeting with Louis Leakey does not establish that the meeting happened inside that building. Discuss how to label that distinction. Treat Gombe as an area unless another source identifies an exact research location.
- Minutes 45–50: collect an exit response: one thing a location helps explain, and one detail that needs another source.
For younger pupils, read the passages aloud and write one caption together. For older students, add a second session to compare the teaching account with an independent biographical or institutional source. If you have only half an hour, use one place and keep the same objective.
Make participation possible without manipulating the map
Give students the site table at the start, not only when the technology fails. Include the captions, source links, legend and a written description of the places’ relationship.
Use text labels and distinguishable symbols as well as color. Describe images, caption video and speak the place names when presenting. A student who cannot use the map controls can select evidence, edit a caption or explain a comparison from the document.
For Earth presentations, narrate orientation and provide static views or a script for students who need reduced motion. Printed maps with numbered sites can support the same task. Assess the explanation rather than mouse control.
Share only the access the lesson needs
For this first lesson, keep the teacher as owner and students as viewers. In the map’s Share controls, invite the intended school accounts and choose view access. Send the link through the school’s usual system, then check it from a student account. Google’s sharing instructions explain the available controls.
A public map is findable; it is not necessary for ordinary class sharing. View-only prevents edits, but My Maps viewers can still share, export and print. Leave student homes, personal routines, last names and identifiable student media out of the map. Follow the school’s data and consent rules before any wider display.
When students need to edit one shared product, invite a small named group. Agree on a group-code naming pattern, who edits each layer and how changes are recorded. A layer assignment is an agreement, not a lock preventing other editors from changing it.
For separate assessed projects, have one student in each pair create a map, give the partner edit access and share view access with the teacher. Classroom can distribute a link or attachment; do not assume it creates a My Map for every student. The student sharing instructions cover those ownership and permissions choices.
Before a substantial editing session, save the map through Export to KML/KMZ. Individual layers can be exported to CSV. Open the saved copy and inspect important captions and features before relying on it; keep the source table too. The My Maps export guide explains what each format preserves. Collect needed files before student accounts close, rather than relying on a link indefinitely.
If the lesson starts with a spreadsheet
For a larger set of public sites, prepare a small sample first. Use column headings, a clear place name and a location field containing coordinates, an address or an unambiguous place name. Include source and date columns.
Add a layer, name it, choose Import and select the file. Inspect several locations against the source before involving the class. The spreadsheet import procedure covers location columns and styling; use import troubleshooting if the file is rejected or only some records appear.
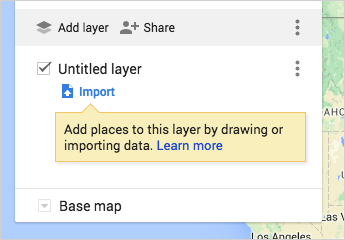
Google’s import guidance supports CSV, TSV, XLSX, Sheets, KML, KMZ and GPX, plus photos from Drive or Photos where account access permits. It sets a 2,000-row import limit, a 5 MB limit for unzipped KML/KMZ and a 40 MB limit for other files. CSV and Sheets can also use a geometry column named WKT.
Keep imported KML simple. Tours, time-based elements, overlays, 3D models and some feature descriptions may not carry over. Before reimporting, save a separate copy: Update matching items deletes existing features that do not match the new file.
For map organization, layers can be hidden or styled by a data column. My Maps allows 10 layers, 2,000 features per layer and 10,000 per map. Its drawing limits also include 50,000 points within lines and shapes and 20,000 data-table cells. Ordinary features cannot be moved onto a directions layer. Plan a modest classroom dataset rather than working near those ceilings.
When the lesson needs Earth
At Google Earth on the web, use a Drive project for shared work. Add places, captions and useful camera views, then arrange the presentation order. Google’s data-type explanation distinguishes editable project features, dataset layers and local KML files.
Local KML is not a shared Drive project. On the web it is saved to the computer’s file system; on mobile it uses local app storage. Save or download changes and submit the file itself. According to Google’s project and local-file instructions, local-file autosave is supported only in Chromium-based desktop browsers. Download older browser-stored KML files or move them into projects by January 14, 2027 to avoid losing them. For an existing file, choose its destination with the Earth KML import guide.
For change over time, use the Satellite basemap and open Historical imagery; Timelapse is available within those history controls. Inspect the available dates before assigning a comparison. Coverage varies, and students should not lose marks for a year the archive lacks. Record imagery dates and treat clouds, offsets and seasonal differences cautiously. AI-generated historical scenes are not historical evidence.
For a terrain extension, give pairs the same two public landmarks. Compare a direct line with one passing through an agreed middle point. The elevation-profile instructions for Earth web and Pro support this task. Require units, the line used and one uncertainty; the distance and area guide helps distinguish a profile, straight-line distance, routed distance and area.
Adapt the next lesson without rebuilding everything
For an actual field trip, keep navigation separate from the classroom map. Arrange multiple stops in ordinary Maps, retain a written itinerary and download the necessary offline coverage before departure. A My Maps directions layer is not offline turn-by-turn navigation, and a drawn line is not evidence of a safe or permitted route.
Choose another subject from the mapping lesson ideas or adapt one of the student project examples. When the task becomes a longer research assignment, set the final captions, conclusion and assessment requirements with student map projects. Keep the source table and accessible alternative part of the assignment from the beginning.


